Vim is quite powerful programmer's editor, but has a very steep learning curve and it takes time to configure it properly. In this tutorial I'd like to share my experiences with configuring vim for efficient symbol, buffer and file navigation. In other words, I'm going to focus on finding these things easily in vim and ignore all other configuration aspects. Getting these things right seems to be the most confusing part for a lot of people who can otherwise use vim already. It's also the part that gives a big efficiency boost when programming or just browsing code, especially when it comes to finding symbol definitions quickly.
Preface
This is by no means a definitive guide on the subject. It' just a bunch of things I learned over years when using vim. Vim evolves, new plugins get developed, so the methods I list here may not neccessarily be the best solutions. But they should work and they do the job for me. These methods should work for pretty much every popular programming language, such as C, C++, Java, Python, Ruby etc.
Looking for symbols
A word of caution first: there is no perfect symbol-based navigation for programming languages such as C++ or Java in vim, as vim doesn't perform any syntax analysis of the code. So, for example, it's not possible to go to the right definition of foo->bar() in C++ code if there are multiple definitions of bar() method, because vim has no notion of foo's type.
Tags
 |
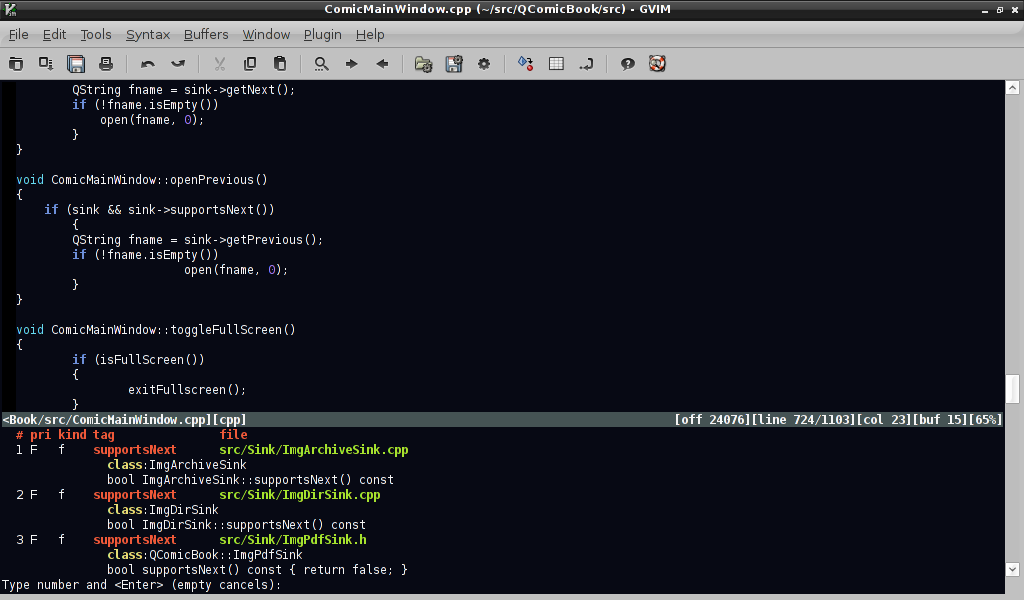
| Jumping to tag with g CTRL-] |
Vim has a built-in feature for looking for symbols based on so-called tags file. Tags file needs to be created first with ctags utility, e.g:
$ ctags -R /your/source/code
This will create tags file in your current directory. Add the following line to your .vimrc file to load tags automatically from current working directory as well as from specific path automatically:
:set tags=./tags,/home/user/your/source/code
From now on, you can jump to the first matching symbol definition by pressing CTRL-] over a symbol. CTRL-T will bring you back to where your search started. If there are several matching tags for a symbol (e.g. overloaded methods), you can use :tselect to choose the right one. Even better, if you know in advance there will be multiple matches, press "g CTRL-]" instead of CTRL-] over a keyword to bring the selection list right away. See :help tags for more information on how to use tags effectively.
 |
| Tagbar plugin window |
Tags list
A very useful feature of most IDEs is the list of all classes/methods/symbols for all open files. This can easily be achieved in vim by installing a plugin such as
Tagbar or
Taglist. Both have similar capabilites, but I tend to like Tagbar more, as it displays tags ordered by their scope and displays method signatures (unlike Taglist, which displays only names).
Cscope-based navigation
Cscope is similiar to ctags, only a bit more powerful since it's capable of searching for functions calling given function etc. To use this capabilities in vim you have to scan you source files with cscope first (e.g. 'cscope -R -b' in your source code directory). Cscope creates a cscope.out file that needs to be loaded in vim by :cscope add /path/to/cscope.out. A common idiom for doing this automatically on vim startup (taken from vim help - see :help cscope) is:
if filereadable("cscope.out")
cs add cscope.out
" else add database pointed to by environment
elseif $CSCOPE_DB != ""
cs add $CSCOPE_DB
endif
Once loaded, cscope symbol database may be queried by issuing :cscope find with a query type and symbol name, e.g. to search for functions calling given function, type:
:cs find c foobar
This is not very convient to type, so you can define mappings for all cscope queries like this:
nmap <C-\>s :cs find s <C-R>=expand("<cword>")<CR><CR>
nmap <C-\>c :cs find c <C-R>=expand("<cword>")<CR><CR>
... and so on.
If you use tags and cscope at the same time, they are independent of each other, use different keyboard shortcuts and need to be queried separately. This can be solved by using :cstag for symbol defintion lookups: cstag searches both databases (by default cscope is searched first). And if you set cscopetag option, i.e.
:set cscopetag
then all tags queries (like CTRL-]) will use :cstag instead, so both databases will be searched.
 |
| Grep search results |
Grep-based searching
Searching for symbols with grep doesn't sound too attractive, but it's actually quite powerful once combined with a handly shortcut key and as long as the symbol you're searching for is not too common.
First off, I highly recommended installing ack-grep, which is a grep-like utility designed specifically for grepping source code files. Then configure vim to use it instead of regular grep - e.g. put this in your .vimrc:
set grepprg=ack-grep\ --cpp\ --cc\ --perl\ --python\ --make
Then define a shortcut key for grep, e.g.
:nmap _g :grep <C-R>=expand("<cword>")<CR><CR>
Pressing _g will grep source code files recursively, starting from the vim's current working directory, for the word under the cursor. Vim places grep results in so called 'quickfix' window, which you can bring up by calling :cwindow. You can navigate through quickfix entries by calling :cnext and :cprev. It's very usefull to map keys for them as well:
:map <F7> :botright cwindow<CR>
:map <F5> :cprev<CR>
:map <F6> :cnext<CR>
If grepping in the current directory is not what you want, then you may want to play with 'expand' macro to grep starting from current file's directory, or from a predefined directory and add new shortcuts for them -- here is how to create a Gvim menu entry for them:
:amenu Devel.Grep\ file\ dir :grep <C-R>=expand(expand("<cword>") . " " . expand("%:h"))<CR><CR>
:amenu Devel.Grep\ source\ dir :grep <C-R>=expand(expand("<cword>") . " " . expand("~/src"))<CR><CR>
Buffer navigation
Standard vim capabilities for navigating to opened files (buffers) are a bit limited when working with large number of files, so installing external plugin(s) is highly recommended. Just for the record, the standard commands for buffer navigation in vim are:
:ls -- shows buffer list
:buffers -- same as above
:bnext -- go to next buffer
:bprev -- go to previous buffer
:[N]b -- edit Nth buffer
There are several plugins that simplify buffer navigation, but I recommend the following:
bufexplorer,
buffergator and
buftabs. Bufexplorer provides a sorted list of all the buffers, which can easily be navigated with cursor keys; pressing ENTER over buffer name makes it active. By default buffers are sorted in MRU (most recently used first) order, but this can easily be changed by pressing 's' in the bufexplorer window. Bufexplorer can be activated by \be, \bv and \bs keyboard shortcuts, but since I use it a lot I prefer a simpler shortcut, e.g. F3 key alone:
:imap <F3> <ESC>:BufExplorer<CR>
:map <F3> :BufExplorer<CR>
Buffergator is similiar, but makes it easy to preview buffers without leaving list of buffers. Upon invocation with \b (or :BuffergatorToggle), a new vertical window with buffers list is opened. CTRL-N, CTRL-P and SPACE keys can be used to navigate the list and preview buffers. ENTER key over buffer name opens it for editing and closes buffer list. One problem buffergator has is its slow response time on invocation: for some reason it takes 1-2 seconds to bring the list of buffers up, whereas it's instantaneous with bufexplorer.
Buftabs is a littler helper addon that is worth installing alongside bufexplorer and/or buffergator. It provides a tabs-like list of buffers displayed in the bottom of the window which is very handy for switch buffers in a circular way, in particular if you map :bprev and :bnext to keys such as CTRL-Left and CTRL-Right:
:noremap <C-left> :bprev<CR>
:noremap <C-right> :bnext<CR>
File navigation
The standard way for finding files is via :Explore [DIR] (or :edit [DIR] and :edit [FILE]). They both support filename completion with TAB key. Explore may be used to find files recursively, if you know only part of a file name, e.g:
:Explore **/*foo*
If you know complete file name, but not its path, you can use vim's built-in find command, e.g:
:find foobar.cpp
This will search for the file in all paths listed in vim's 'path' variable, which is current directory and /usr/include by default. You may want to set to also include subdirectories of your sources directory, for example:
:set path=.,~/src/**,/usr/include,,
Vim's path variable has one more use: it allows for opening files whose name is under or after the cursor. A typical use case is opening an included file in C/C++ source code, by moving over file name in the #include directive, and pressing 'gf' (goto file). Quite handy.
There are plugins which make finding files easier. One of the most useful is
NERDTree, which implements a nice filesystem explorer in the form of a tree structure. It's very fast (uses caching), configurable (screen position, list of file patterns to be ignored etc. can be adjusted) and smart (e.g. remembers last cursor position when toggling off and on). It's so useful that its worth having a dedicated keyboard shortut for it, e.g.
:imap <F4> <ESC>:NERDTreeToggle<CR>
:map <F4> :NERDTreeToggle<CR>
Conclusion
The above tips should improve your day-to-day productivity a lot when programming. Go use it, learn it and improve. And let me know in the comments about your ideas and improvements!